Are the Swedes really THAT much smarter than me?
I am no slouch when it comes to assembling IKEA furniture. Give me an allen wrench and let me have at it and ye shall have a fine entertainment center in no time.
HOWEVER.
There is something strange and unknowable about the IKEA Picture Hanging Kit. And yes, I am actually writing a post on it because it confounds me (and I don't like to be confounded). I have about 4 or 5 IKEA Picture Hanging Kits in my home with all of the gold hooks and nails gone and used, because they are the only component of the assortment that I know what it does. Let me introduce you to some of the other parts, and if you are of Swedish descent and/or can tell me what they do, then I will send you some meatballs and lingonberry sauce:
 Ah, my first nemesis. The plastic hook I can understand. The three prongs pointing out towards you I cannot. Do you impale your picture on the prongs or hang it on the hook? Unknown.
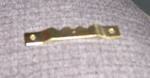 This thing looks like you could nail it (?) to your picture? And then it would grip a nail on the wall? That seems like a lot of work when I could just use a thumbtack. Who uses these?
 I have sat and turned this guy over and over in my hands and tried to figure out which side is the front and what one would do with it. I see no nail hole. I am baffled.
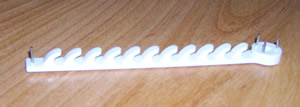 And here's the granddaddy of them all. It's for when you want to hang eleven things on little hooks, AND impale things onto four prongs. What am I missing here?!
I have no doubt that someday the heavens of knowledge will open up on me, and in a celestial chorus of wisdom, I will suddenly understand all the pieces of the IKEA Picture Hanging Kit and my walls will look that much more professional and flawlessly hung. Maybe I'll also get to use the X-Acto knife and twine that come in the kit as well.
This is not meant as a poor "dumb girl" post (not at all), but maybe I am just bitter because I nailed an IKEA nail INTO my finger today while trying to utilize these mysterious bits of hardware. Frickin' IKEA (oh, and are they a purveyor of possibly phallic photography or not?).
I Don't Think I'm Ever Going To Figure It Out (b-side) - Elliott Smith
Building A Mystery (live) - Sarah McLachlan
Labels: laughs
posted by heather @ 5:01 PM
25 comments
![]()
![]()


25 Comments:
Hi Heather,
The first picture hook, you just place it on the wall where you want it to go, then whack the 3 metal prongs so they go out the other side of the plastic and into the wall.
No idea about the others!
Sorry, I just looked at them again. I guess the last one is the same as the first, but I have no idea why it has 11 hooks. The middle two look like they go together but I don't know how.
The first one is used as said nabove but not on drywall. It is made for pounding into concrete walls.
You people are fabulous. In inspecting the plastic hook thingie, there is indeed exit holes on the back side of the metal prongs. NEVER would have gotten that. YAY! I rejoice. My world makes a tiny bit more sense now.
The last item resembles a cd rack that I have seen at IKEA. If indeed this is what it is intended for, insert the cd case at an angle (low end against the rack and high end protruding out) and the tension will hold it in place. As previously indicated, it appears as though it is intended for some application other than drywall.
Yeah but the meatballs are delicious. Thery taste just like the Salsbury Steak I enjoyed in my TV Dinner as a child.
Oh wait, people are actually figuring this out? Wow.
I have never seen the others...but I do know how the second one works. You are correct in what you said about your post. You nail that to the frame of the picture, then hang that on a nail on the wall...it is for frames that don't have wires on them
This comment has been removed by a blog administrator.
Well let me tell you I feel your pain. I finally found this company while watching the HGTV channel last week and orderd me a set. I'll tell you how it goes, according to everything I've read it's completely dummy proof, we'll see if my husband can hang it once it arrives.
http://www.thepicturewallcompany.com/
I'm with you. IKEA are evil.
Although there was that wondeful pillo for only 9.99 the other year, and then that lamp despite the bulbs being rarer than a dodo was rather sweet, and...
the first is a Floofenburry
the second is a Glurgsnurgler
the third is a Hausawah
the nice thing about the gold one is that you don't have to get it exactly centered on the picture, because if it's off to one side or the other, you can use a different notch to hang it. It's good for frames that don't have a lip to catch the head of a thumbtack or nail.
The third (black square) one looks like the type that snaps into place under a poster style frame. I can't see it clearly enough to be certain, but if so, the side above the u-shaped opening will have two small ridges that will catch under the poster frame, so the u can slide on top of a nail and hold the frame up from below.
Yes, I know too much about frames. But I don't know as much about music as you do. :)
Yes we are.
Wow,
What ever happened to pounding one nail in the wall? The most complicated wall hanging I ever did, was when I had to cut and string wire to the back of a frame....
The times they are a changing...
Sorry to be pedantic, but wasn't the Elliott Smith track available on a 7" b-side somewhere?
the advantage of the hook with the 3 metal bits is that you can take the hook out if you decide to move the picture without ripping half your plaster off the wall (just carefully pull 3 metal bits out using pliars).
Ross, I thought I'd heard it somewhere else too. So I've noted it as a b-side now. Maybe Chad or Connor or another of my E.S.addicts can enlighten us.
Heather,
Yeah, he's right - that Elliott Smith song was actually the third of three songs on the 7" single for "Speed Trials" ("Angeles" is the other song on it).
Yes, I'm a dork.
Cheers!
Yes, you are a dork, but that's why I love ya. Thanks!!!
i think the last one has so many ridges because you can just bang it into the wall and adjust the height of the picture by using a different ridge???!
you know how you remove the backing to put a picture in a frame? well, before you put it back, slide the 3rd thing like a paper clip onto the center top of the backing, replace the backing, and presto, you have a little slot to hang the frame on a hook.
think that covers everything, no?
Love the post! That second one works quite well, and keeps things more flush to the wall than an tack, but actually getting it on the frame has always been a bit of a challenge to me. I find the nails they give you so short that you have to hold it in place with a tweezer to initially drive it into the frame, unless you want to hit your thumb. Once you figure it out, though, it does the trick!
Hello there,
Pic #4 is the same product as pic #1, but gives you the option to adjust the height of whatever it is that you are hanging with making further holes in the wall.
I love IKEA me, especially the one @ Lakeside!
Thanks for the laugh this morning. Clearly, the reason I read you blog is because I bought this picture hanging kit at IKEA last night and now this morning cannot figure out how to use any of them. Well, I thank all of you blogsters for trying, but still cannot seem to figure this out. When they open at 10:00, I'm calling. Maybe I'll go online and "ask Jenny" I'm sure she'll be a big help.
Me again - sorry - I meant "ask Anna". And by the way, I just asked her and she's no help. She keeps repeating herself - funny, I thought I might actually get a real person.
Post a Comment
<< Home